Month: November 2020

  • Top Five Online Learning Platforms

    Top Five Online Learning Platforms

    Are you trying to learn a skill or acquire a degree online? Well, several accredited platforms would do a great job of giving you that online schooling you need. In this post, I would be highlighting five of the principal online platforms you could engage in. Check them out!

    #1:Udemy Online Learning

    Udemy online learning platform is regarded as one of the most reputable learning sites today. Currently, it boasts of having over 50 million registered users and over a hundred certified courses. These courses are well transcribed in as much as 65 languages from around the world.

    Here are some categories you may find on Udemy:

    • IT and Software.
    • Design.
    • Marketing.
    • Business.
    • Creativity.
    • Personal Development.

    These are certain categories that you could pick a course from. At Udemy, they offer you learning at your own pace, and you have a 30-days money-back guarantee. The classes cost about $10 to $20, convenient for even learners on a tight budget.

    There are also a few bonus and discounts that new and existing learners are eligible for, they are:

    • A monthly 95 percent sales discount on the courses offered.
    • A free 7-days trial period access.

    At the end of each of your courses on Udemy, you would get a certificate of completion to boost your career credibility.

    You can enroll in their courses by going straight to udemy.com

    #2: LinkedIn Online Learning

    Around the professional world, LinkedIn has a reputation as one of the most business-oriented online platform. It has served as a recruitment place and a forum for professionals to meet and connect with themselves. However, that’s not all the platform is there to offer. It has an online learning program, as well.

    At LinkedIn online learning platform, individuals that intend to get certified can enroll in their courses. Though the learning aspect of LinkedIn is relatively new, it comes at least 25 years of tutoring experience.

    The learning aspect of LinkedIn came into the picture when the platform purchased the online learning platform, formerly known as Lynda.

    Some of the categories of courses offered on this platform include:

    • Data Science.
    • IT and Software.
    • Business.
    • Creativity, etc.

    These categories have over 15,000 courses available. Also, as an already registered user, you get recommendations based on your profiling. The courses cost $29.99 monthly, but you get a 33% percent discount when you subscribe for a year. Annually, you would be required to pay just $19 monthly.

    At the end of your course here, you also get a certificate of completion for the course you have just concluded.

    You can log on to LinkedIn.com to start your learning process.

    #3: Coursera Online learning

    Coursera has also won its spot as one of the leading online learning platforms available to learners around the globe. It was founded in 2012, and ever since then, it has collaborated with more than 190 reputable universities in the world.

    Created by two professors from Stanford, its goal is to bring the world the best of education from their devices’ comfort.

    Some of the companies and universities that Coursera partners with are:

    • Stanford University.
    • Google.
    • IBM.
    • Imperial College, London.
    • And more.

    A courser, you can learn a new skill and get certified in less than two months of active involvement. There are over 4,100 paid courses to choose from on this site.

    Note, there are also free courses that are available on Coursera for people as well. It comes unlimited access to courses as you can decide to enroll in as many courses as possible.

    The annual fee for Coursera is about $399, and then you can have unlimited access for a full year. But, if you prefer paying monthly, it comes at $49 to $79, depending on your course of interest.

    With Coursera, you have access to the following bonuses and discounts:

    • Seven days of free premium membership trial.
    • Up to 50% off the premium membership when you are enrolled in one of the partnering universities.

    For more information on their courses, log on to coursera.org

    #4: edX Online Learning

    EdX is an online learning platform birthed in 2012 by a coalition between Harvard and MIT. If you always wanted to have a certification from either of the two universities, this may just be the opportunity.

    As a non-profit oriented learning platform, it currently has an estimate of over 22million registered users. Reputable educators teach classes from world-leading universities and corporations.

    EdX is the perfect synergy of career-advancing courses and fun at the same time. If you have other engagements that require your attention, then this platform should be considered. You can stop and continue the learning process at will, depending on your scheduling.

    At edX, you can learn various courses like:

    • Culture and technology.
    • The science of beer.
    • Circuits and electronics.

    These are just a few courses that are handled by MIT and other top-rated universities. EdX has two types of degrees –the MicroBachelor Programs and the MicroMasters Programs.

    For the MicroBachelor Programs, you would require a range of $500 to $1500 for a sum of the courses. However, there are also free courses, but you would have to pay for the completion certificate. This also costs between $50 to $500.

    Do you think this is the platform for you? Then log on to edX.org

    #5: Skillshare Online Learning

    As an online learning platform, Skillshare aims to help individuals from several career paths learn a new skill. It is relatively new compared to the other platforms I have highlighted in this post, but it promises you quality.

    Here, you have access to classes in the following areas:

    • Lifestyle.
    • Creativity and art.
    • Personal development.
    • Career advancement.
    • Entrepreneurship.

    It has over 20,000 classes and a group certain where you could connect with other learners like you. However, though there are a handful of free courses available on this platform, a premium account gives you more. You can develop different skills as you want, get involved with other learners, and more.

    With this platform, you can also learn at your own pace as the schedule works around your free time. You are mandated to pay $12 monthly for a premium account or $8 monthly if you are paying for the full year.

    As a new subscriber, you get a discount of two months of free premium registration. This is for you to certify that you are fine with the learning platform.

    So, if you want to try out this platform, then you should log on to skillshare.com.

    Conclusion

    Online learning doesn’t have to be a big deal anymore, as there are readily available platforms that could get you hooked. They offer generally acceptable courses that could help you advance your career or even start a new one.

    Written exclusively for our company by Sherise

    Source: CoolMambo.com

  • Online Class Guide: Six Reminders on Online Class for Teachers

    Online Class Guide: Six Reminders on Online Class for Teachers

    Distance online learning has existed for quite some time now, but not everyone is accustomed to having their classes in front of a device. Due to circumstances that make face-to-face classes unlikely, teachers still need to make sure that the lessons’ objectives are achieved. Hence, certain adjustments are necessary to make online classes as effective as physical classes.

    With the current educational situation nowadays, teachers are faced with challenges on how to make the teaching-learning experience possible. Teachers are pushed to adapt to the changes in education in these trying times from considering the curriculum guides’ contents to creating inventive and friendly online and offline tasks in online classrooms. So, here are some things teachers can keep in mind when dealing with online distance teaching and learning.

    Quick Guide for Teachers in this Time of Online Classes

    “I can’t meet my students physically; how can I do my job?” This is a common question many teachers around the world are asking right now. The sudden closure of schools and educational institutions has made the change of the mode of teaching into something technologically driven. Hence, here’s a quick guide for teachers who are holding their classes online.

    Always go back to the curriculum guide and class syllabus

    Curriculum guides and syllabuses are documents that contain all the essentials that need to be achieved in class in a specified amount of time. Perhaps now, some revisions are being done already; not all contents are included, and some topics are merged, condensed, or completely set aside. Only the most essential learning competencies are covered that would suit online instruction.

    Even so, teachers are expected to adhere to CG’s and syllabuses. Following these documents makes lesson planning easier, and activities would be more focused on what is essential given the online classes restrict continuous feedback and student interaction.

    Use Various Video Conference Platforms

    Besides managing a social media account, perhaps most people are already making accounts on various video conference applications. Now that classrooms are transferred on the internet, we are currently exploring web meeting platforms such as Google Meet, Microsoft Teams, Zoom, Discord, and others. These platforms offer a range of features that allow participants to gather in a virtual meeting room.

    Through the share screen, teachers and students can do presentations for lectures, discussions, reports, games, and other activities. Also, break out sessions for smaller group discussions can be possible. Whatever platform is applicable, make sure that students can access it and be given the opportunities to use it to the fullest.

    Strengthen Asynchronous Tasks

    Students are not online all the time. Problems on power and internet connectivity would always be valid reasons for them to miss live video conferences. So it is vital to strike a balance between online and offline tasks to support continuous learning.

    These may be some ideas you can try on your offline class sessions:

    • Encourage reading. Whether it’s reading for a requirement or reading for pleasure, teachers must encourage students to read. They can recommend texts and books for students to read or refer them to online libraries for more selections during live sessions. Of course, this must be accompanied by guide questions and pre and post-reading tasks to ensure that students comply with reading assignments before the next video conference.
    • Distribute worksheets. For younger learners, worksheets are beneficial for them to keep occupied on offline days. Parents can download and print worksheets on math or letters and vocabulary and help kids practice their skills. For high schoolers, worksheets must be available to supplement and complement the discussed lessons.
    • Diary or reflection logs. Having a notebook at home is essential to have so students can have an avenue to write their thought and reflections about the week’s lessons. Furthermore, it can enhance their note-taking abilities, which is needed when face-to-face lectures are possible. Kids do not have much interaction with peers and teachers at school so having their ideas written on paper promotes intrapersonal communication.
    • Going physical and environmental. PE classes are challenging to hold online, a challenge for teachers to get students active and moving. So, physical tasks must be ongoing to support consistency. Teachers can let students do some simple physical tasks at home, such as warm-up exercises, jumping jacks, squats, and a little bit of jogging and running. Some sessions must be video recorded so teachers can monitor the activities of their kids.

    Another thing is environmental activities. Again, a recorded task through videos or photos can be done to monitor their work, such as setting up segregation trash cans for biodegradable and non-biodegradable trash. They can also do plant care and tree planting activities. Creating posters and infographics are also suggested to promote awareness in the household and community.

    Create or search for Creative Materials and Resources

    Since online classes can be tedious and monotonous due to the overflow of recorded videos and PDF materials to read, creativity is necessary. For smaller kids, teachers can perform an act before the class starts. A puppet show will do to introduce the lesson. They can also bring in resource speakers who are experts on the topic to talk and share exciting works.

    YouTube is a beneficial site for online teaching, so better to check for fun and appropriate videos that support the lesson. Also, teachers can set up themes every live session so kids will look forward to dressing up and be creative even if they stay in their rooms.

    Modify Assessment Tools

    Assessment is another thing that could stress out everyone. After lessons and activities are done, what now? Usually, tests are given to check whether learning is achieved or not, but concerns may arise with the distance.

    For one, cheating can be rampant. When teachers give objective types of tests, they may refer to their notes or look for answers on the internet. Worse, they can let other people do the tests for them.  To be able to address these, teachers often do tests on live sessions, requiring kids to turn on their cameras. They also set a time limit for each item so students won’t have enough time to search for answers elsewhere. However, there is no guarantee that the results of the tests would be fair and accurate.

    One thing to consider is to modify the types of tests. Reading comprehension items can be a useful tool so that kids would focus on their tests. Since answers are just found in the text, it is difficult for them to look it up in sources. Another thing is to make objective items situational. Instead of asking directly for a term, teachers can put it in context and turn simple fill in the blank items situational. This is the same with math word problems. Lastly, teachers can always ask essay questions. It may be hard and long to mark, but all competencies can be covered in essay tests.

    Check on Students Regularly

    All parties – teachers and students – are adjusting to this new normal in education. So, it is necessary to check on students’ conditions regularly. Some students may not be privileged enough to join online sessions regularly, so it is advised to compromise and agree on things that can be done for them. Also, looking at screens for long periods can be detrimental to eye health, so asynchronous tasks must be given to them from time to time.

    The point is to check each other’s’ mental and emotional state regularly. Now is not the time to impose rules and policies that do not promote equity and well-being, so teachers must periodically check on their students and think of ways to enhance instruction given limited movement and resources. Same thing with students, too. Teachers need time and space to check submissions and create lessons, so students also need to check on their teachers.

    Online Classes on the go

    The popularity of online classes these days has dramatically impacted the state of everyone. Hence, as facilitators of learning, teachers need creative and innovative ways to deal with online instruction demands. Anyway, when all troubles pass, they are already equipped with knowledge and skills for more flexible learning and teaching experience.

    Written exclusively for our company by Karen T

    Source: CoolMambo.com

  • 5 Strategies That Encourage Independence For Seniors

    5 Strategies That Encourage Independence For Seniors

    There are many challenges that come with old age. Besides being old and frail, your sense of independence during this stage of life is also threatened.

    Being independent plays a huge role for seniors to maintain their health and strength. In fact, this sense of independence is actually an important factor throughout life – from at a young age all the way to being an elderly. So, as you consider these 5 strategies that encourage independence for seniors, you will be better able to help your old folks, as well as your future self when you reach this inevitable age.

    • Allow seniors to make their own decisions

    The first thing that you must understand is that when people reach old age, their body naturally degenerates. This means that their abilities become limited. Therefore, old people no longer have the strength that they once had when they were younger. This, of course, can get frustrating for them, especially when it comes to things that they were used to doing often.

    So, one of the biggest ways that you can help seniors maintain their independence is by trusting them enough to make their own decisions. At the very least, you can provide options for them to decide on. That way, they can still feel like they are in control of their life. This strategy is also a great way for seniors to avoid feeling discouraged, which can commonly come with being considered old.

    • Make their homes easily accessible

    Today, thanks to advanced technology and medical development, people are living longer than past generations. This means that more and more nursing homes are being built to cater to the increasing number of seniors.

    Despite how good or beneficial nursing homes are, though, most seniors prefer to continue living in their homes. After all, being in your own home can bring a lot of comfort and security. So, what you can do to make sure that your grandparents or even parents keep their independence at home is to make their house easily accessible. This can mean building a ramp or setting up electronic methods for simple entering and exits.

    • Ensure that their homes are safe and secure

    Besides turning your old folk’s house into an easily accessible home, you should also ensure that it is a safe place to live in. Because your actions are restricted during this age, there are fewer things that you can do and this includes defending yourself from dangers.

    By setting up safety equipment in the house, not only will seniors feel more secure, but you will also feel reassured that they will be safe by themselves. In addition, you can buy safety equipment that you can set up inside the house too. As a result, all of these safety gears and systems will help make seniors feel much more independent.

    • Prepare all items and objects for convenient use

    What this strategy means is that every elderly home should be set up in a convenient manner for seniors to not have to work too hard to get something. This, for example, might mean that you will need to make some slight remodeling in the kitchen so that the food storage cupboard is at a comfortable height level. That way, seniors living at home will have less chances of struggling just to get food.

    This strategy can be applied to other things in the house as well, such as organizing utensils and kitchenware to be within proximity to each other to avoid constant moving around or placing remote controls within reachable areas like at a small table by the couch. These little things that you can do for seniors will make a great impact on how easy their life can be without you having to do everything for them.

    • Introduce technology to seniors

    This last strategy is one that might be a bit costly, but will no doubt encourage independence. This is because having voice-operated machines or sound-sensitive tools can help seniors feel empowered by not having to require help from others. One thing to remember about the elderly is that they tend to be stubborn when it comes to asking for help.

    So, as you introduce them to technology that they could use on their own, they will feel a sense of pride in performing things themselves. You will also feel more at ease knowing that your loved ones have everything they need to accommodate their day to day needs without constantly worrying.

    Why Independence is Important for Seniors

    When you start to grow old and frail, you will begin to notice how fragile life is. As you realize this, doing certain things that were once simple and trivial will start to become difficult and even complex. As an elderly man or woman with no more work to do or children to take care of, this can get very frustrating and discouraging.

    As a senior citizen, your life is no longer needed within the community, at least for economical purposes. Rather, in today’s society, the elderly are encouraged to retire and settle down for the remainder of their lives. For some old-timers, particularly those who have worked their whole lives, this can be a tough reality to accept. Therefore, helping older people to maintain their independence is even more important in order to help them enjoy what life they have left.

    Independence builds personal strength

    As mentioned already, having a sense of independence can make you feel in control. This mindset can definitely help seniors feel, not only good about themselves but also confident in taking care of themselves if they live alone.

    The longer a senior can take care of their own self, the more optimistic they will view life. This outlook can build their strength to keep living and enjoying the little things that bring happiness in life. Even if they know that they’re slowly dying away, they will at least remember that they lived their life to the fullest and as best as they could.

    Independence promotes positivity

    When you have lived for tens of years and have plenty of life experience, it can be easy to feel discourage knowing that you don’t have many years left. It also doesn’t help that you’re children are all grown up and no longer need your help, not to mention that most seniors are no longer needed in the workplace.

    The last thing that old people want is to feel powerless. So, by encouraging them to be independent as much as possible, you are helping them promote a positive attitude that will help them to get through the trials of old age. Furthermore, a positive attitude has been proven countless times to increase well-being and health.

    Conclusion

    Whether you are past the halfway mark or have already reached the old age category, it is never too late to prepare to maintain your independence. An independent elderly can help make all parties, both themselves and their guardian’s life’s easier. As you apply these 5 strategies that encourage independence for seniors, you will spend more of your precious time focusing on visiting your loved ones that just taking care of them.

    Written exclusively for our company by Angie Enero

    Source: CoolMambo.com

  • Best cars for sports racing 2020

    Best cars for sports racing 2020

    Sport racing can be quite a big deal, and some cars are designed for such purposes. These cars have the horsepower and turbo speed to go as fast as you would need them in any race. However, picking the wrong one comes easy without the right information.

    In this review, I would bring five of the best cars you could use in sports racing. So, instead of making an uninformed choice, you should check this out!

    #1: Mazda MX-5 Miata

    The Mazda MX-5 Miata was first introduced to the sporting scenes in 1989. Several drivers all around the globe have chosen this sporting automotive over again because of its rewarding features. The latest model of this car has a playful chassis, and you may find the engine pretty ready for a rev. 

    Well, that’s not all!

    With the Mazda MX-5 Miata, you also get something you don’t find easily. Instead of the conventional computer automated sporting cars that have taken charge, you get an analog design. This gives a sports racer the flexibility to maneuver their way to the top of the game.

    Some may say this isn’t a practical sporting car but checking the specs, and you could have a change of heart. This is one of the most affordable four-wheeled driven sports cars you could find.

    Well, here are more on the specifications of the Mazda MX-5 Miata:

    • Horsepower: 181hp/7000rpm.
    • Compression ratio: 13:1
    • Fueling system: Electric controlled fuel injection.
    • Fuel capacity: 11.89 gallons

    #2: Toyota Supra

    The legendary Toyota Supra comes with excellent sporting performance. It is designed with a hooded frame and a turbocharged six-cylinder engine. As a sporting car, the Toyota Supra comes with a 335 horsepower enabled engine.

    When it comes to maintenance and fuel consumption, the design is regarded as being somewhat conservative. This means, during long-distance races or journey, the amount of resources consumed doesn’t go overboard.

    However, people like to go for the new BMW Z4 when it gets down to the two being compared side by side. They claim the BMW Z4 is a drop-top sports car. Still, they share a similar amount of powertrain and underpinnings.

    Still, the Toyota Supra has a bit more personality than the BMW, which makes it a rather distinguishing factor.

    Here is a tabular comparison between the BMW Z4 and the Toyota Supra:

    SpecificationToyota SupraBMW Z4
    Vehicle typeRear-wheel-drive, 2-passenger, 2-door coupeRear-wheel-drive, 2-passenger, 2-door convertible  
    Engine typeturbocharged and intercooled DOHC 24-valve inline-6, aluminum block and head, direct fuel injection  turbocharged and intercooled DOHC 24-valve inline-6, aluminum block and head, direct fuel injection  
    Displacement183 in3, 2998 cm3  183 in3, 2998 cm3  
    Power335 hp/ 6500 rpm  382 hp/ 6500 rpm
    Torque  365 lb-ft/1600 rpm  369 lb-ft/ 1600 rpm  
    Transmission8-speed automatic  8-speed automatic  
    Highway range470 miles510 miles
    Road holding300-ft-dia  300-ft-dia  
    Brakes (F/R):13.7-in vented disc/13.6-in vented disc  13.7-in vented disc/13.6-in vented disc
    skid pad1.05 g1.02 g

    With this many similarities and differences between the two sports cars, you may find it hard making a choic3e. However, when it comes to duality or versatility, I would always suggest the Toyota Supra. The BMW Z4 is a great sports car that gives you more in terms of mileage, horsepower, etc.

    #3: Chevy Corvette

    The Chevy Corvette, also known as the C8, is a new mid-engine sports car that offers its drivers perfection. Having won an award and earned a spot as the ten best sports car, the Chevy also boasts a strong engine power. The Chevy Corvette can be placed side-by-side with the Porsche, Ferrari, and McLaren’s passenger cabin engines.

    The Chevy is available as a convertible with a retractable hardcover, or you can choose it as a coupe with a detachable roof panel. It has a 6.2-liter engine V-8 that makes it up to a 490 horsepower engine.

    Still not satisfied with the details, check out more of the specs below:

    • EPA Classification: Two Seater
    • Drivetrain: Rear Wheel Drive
    • Required Fuel: Gas V8
    • Displacement (liters/cubic inches): 6.2L/-TBD
    • Horsepower: 490/6450 RPM
    • Torque: 465/5150 RPM

    The Chevy insides are designed with a mix of leather, imitation suede, and real metal. If you are looking for a luxurious sporting car, then this is just it. It gives you a removable roof that can be taken off whenever on a leisure ride or even while racing.

    The Chevy Corvette also has some entertaining feature that would keep you company during your ride.

    They include:

    • An 8-inch touch screen integrated with a Bluetooth audio streaming feature.
    • A 4G LTE mobile hotspot connectivity.
    • Android enabled auto capability.
    • A wireless Apple Car Play.

    With these features, it becomes straightforward to respond to commands and go about serving you with ease.

    #4: Porsche 718 Cayman

    Next on the list of the best sporting cars is the Porsche 718 Cayman. This is an enthralling sporting machine that gives you an unquestionable level of feedback as a driver. This is not the favorite Porsche car on the market, but it is a superb sporting choice.

    It has a professionally tuned chassis that is complemented with three different flat-four cylinder engines. You can get this ride with either a telepathic automatic transmission or you could have it with a trusty manual.

    As a driver, you can easily personalize the Porsche 718 Cayman. It has a limitless amount of individual options and even keeps its reputation as a rider even when you are off the sporting track.

    Here are some of the specifications as well:

    • Vehicle type: Rear-wheel drive.
    • Engine type: Turbocharged and inter-cooled DOHC.
    • Horse power: 365 hp/ 6500 rpm.
    • Torque: 309 lb-ft/1900rpm
    • Transmission: 6-speed manual.
    • Road holding: 300-ft
    • Skidpad: 1.05 g

    #5: BMW M2

    With the BMW M2, BMW outdid themselves to the very least when making sports cars. This sports car comes with an edge breaking turbocharged inline-six engine that is creamy soft to use. It has incredible handling and a stellar brake system.

    The BMW M2 has a six-speed manual transmission, a 405 horsepower, and a seven-speed dual-clutch automatic control. But, the dual-clutch automatic control comes optionally.

    Here is more on the specifications of the BMW M2:

    • Vehicle type: Rear-wheel drive.
    • Engine type: Twin Turbo Premium Unleaded I-6
    • Horsepower: 405/ 5230 rpm.
    • Torque: 406 lb-ft/2350 rpm
    • Transmission: 6-speed manual.

    Conclusion

    When choosing a sporting car, you would need to understand their unique features and make your decision. However, in this post, I have detailed the best cars you could use for sports racing. They have the capacity and mileage to travel long distances within a short time without burning out.

    Written exclusively for our company by Sherise

    Source – CoolMambo.com

  • 6 Things You Should Do Before Investing

    6 Things You Should Do Before Investing

    What do you really know about investing, besides it being “must-do” in this day and age? If you have not invested your time/money (pun intended) in some investment course or at least watched some YouTube videos, chances are – not much at all! Before you put your hard-earned money into anything at all, please keep in mind that investment is a risky venture and should be done with caution and with a good amount of research done on your part. Also, this is a long term affair, so don’t expect to become rich overnight. 

    It is safe to say that there is plenty to do before you even start investing your first dollars. Just like you do some warm-up before your main exercise or study to take a test, there is some prep work involved in the investing process. Don’t skip any of these 6 steps and you can thank me later. Again, some of these steps will require time and effort. Don’t rush. When it comes to money, it is important to have yourself and your assets protected. To be honest, these steps are great for anyone, even if you are not interested in investment right now, still it will be beneficial for you to look into these steps and evaluate your current situation. 

    Truth is, we spend all these years in school just to graduate and go make money, but we learn absolutely nothing about money! How to make them, how to manage them, how to make money make more money? Education yourself in financial literacy regardless of your age and income is important and can help increase your wealth and as a result your overall level of happiness and quality of life. 

    Let’s dive right into the topic. 

    1. Save $1K (before your debt is paid).

     This is that amount that should be untouchable unless you are in real trouble. For everything else, you should have point #3. 

    • Pay off debt with an interest of about 4% or more. 

    Focus on paying off debt that eats up the most of your money with time. This is just a smart way to do it. In order to find some great tips on how to pay off debt efficiently, look up Robert Kiyosaki’s tips on this subject. He explains the difference between bad and good debt very well and helps you identify what to target first. We are talking mainly about credit cards or car loans. If your mortgage is more than 4%, you may want to look into refinancing. Please consult a professional before making any decision. 

    • Establish your emergency fund (enough money to cover your expenses for 3-6 months). 

    Remember that financial safety net, everyone is talking about? This is it. With everything going on in the world, you never know what can happen tomorrow and the most stable job in the world is not a 100% guarantee you will get paid next week. We live in a time of uncertainty. You want to make sure you have this solid amount set aside before making any investments. 

    • Save up for larger goals that you want to accomplish in the next 3-5 years (house down payment, wedding, trips, etc).

    Life doesn’t have to stop for you being busy paying off debt and saving up for what may come. Don’t forget that the only real life that you have happens right this moment. It is vital to have funds for things you want to accomplish in the near future. Maybe your family is growing and you want to get a bigger house, or you are planning this dream trip overseas. Life doesn’t wait for you to be done with steps 1-3. Allow yourself to dream and also have money for that. 

    • Educate yourself on investing basics.

    This is a very important step that can be very well done together with the other 4. While you are saving up, you can start doing your research. There are plenty of free materials available in both video and articles/book form. You can choose an advisor and follow them on Instagram to be getting bits and pieces of information on a daily basis without overwhelming yourself. 

    • Create an investment plan. How much are you going to invest, how often, what you’ll invest in, and what account type to use?

    This is the key! The plan will ensure you are on track, you have yourself covered and you know what you are doing. 

    If by the end of this article you feel demotivated with the amount of work you need to do before even thinking of investing, let me cheer you up! First up, you have made it all the way to the end of the article that means you are really interested. Second, now you understand that this is not something you can approach lightly and that will prevent you from mistakes that could literally cost you. And last but not the least, you have just done step #5! You have learned something about investment. Your steps don’t have to be huge, but they have to be consistent. As a famous Japanese proverb says “Fast is slow, but continuously, without interruptions...” Give yourself a pad on the back, you have done your 1 step for today. Now go ahead and plan one for tomorrow. Little by little you will notice your knowledge increasing and your debt reducing. Good luck! 

    Written exclusively for our company by Anna Aguilar

    Source: CoolMambo.com

  • How to Shape Your Eyebrows at Home

    How to Shape Your Eyebrows at Home

    Regardless of the restrictions in your area, you might not feel comfortable going to a beauty salon to get your eyebrows professionally shaped in the current situation, given the close proximity of therapist to client, and also given the amount of protective equipment that needs to be worn by both.

    None of us want to walk around looking like we’ve got two furry caterpillars on our faces, but none of us want to end up with that overplucked nineties look either!

    To help you get it right, here’s our foolproof guide to keeping your brows under control until you’re comfortable to return to the salon.

    Preparation

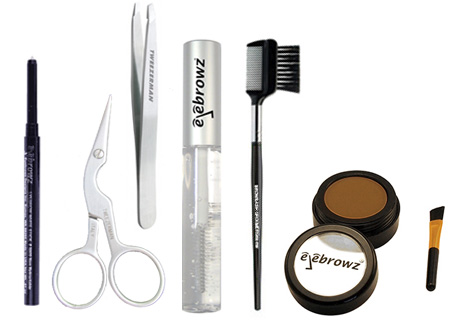
    Start by gathering your equipment – and ensuring that it is scrupulously clean! You’ll need:

    • Good quality slanted tweezers
    • Brow pencil
    • Small pair of sharp scissors
    • Spoolie brush
    • Gentle cleanser such as micellar water, and cotton pads
    • A soothing gel containing aloe vera or tea tree oil

    Make sure your mirror is in a well-lit space so that you can see what you’re doing properly.

    And don’t forget to prepare yourself! Cleanliness is key – so cleanse thoroughly before you start. It’s easier to pluck your brows when your pores are open – ideally after a shower as the steam will help you along. But if that’s not practical, hold a (clean) warm wet washcloth over your brows for a couple of minutes after you’ve cleansed to relax the skin. This will avoid infection and blocked pores – spotty eyebrows are not a good look…

    If you have long hair or bangs, wear a hairband to keep your hair away from your eyes.

    Brush and snip

    Some of us get very long stray brow hairs, and it can be tempting to just pluck them out. However, this can lead to uneven, gappy brows. Instead, the best way is to trim them.

    Use a clean spoolie brush to brush your brow hairs upwards. Slowly and carefully, one at a time, carefully snip the end of any hairs that extend beyond the outline of your brow. Only take a little from the end – err on the side of caution if in doubt.

    Then brush the hairs downwards and repeat the same process.

    Determine the shape

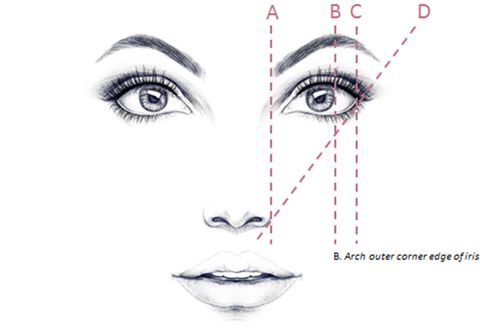
    You can use an eyebrow pencil to determine the shape of your brow. Place the pencil along the side of your nose to find the spot where your brow should start. Then angle the pencil from the edge of your nose and over the center of your eye (your pupil) – that should be the highest point of your brow. Finish by lining the pencil up with the corner of your nose and the very edge of your eye. Where the pencil intersects with your brows is the point where the brow should stop.

    Mark these points using the brow pencil, and then use these points to draw an outline shape that will be your guide when tweezing.

    If that all sounds daunting, and you need a bit more of a helping hand with determining your eyebrow shape, why not try using an eyebrow stencil kit instead?  They can be a lifesaver for those who are less confident with where their eyebrows should start and finish. Anastasia Beverly Hills sells a set of five reusable stencils for $20.00, available from www.anastasiabeverlyhills.com that enable you to find the right eyebrow shape for your face type.

    Slowly does it

    You should aim to remove as few brow hairs as possible. Take it slowly, and if in doubt, don’t tweeze!

    Remove any hairs that fall outside the outline that you’ve drawn. Pluck one hair at a time and tweeze in the direction of growth. This helps avoid those unsightly ingrown hairs.

    Focus on the underside of your brows – removing too much from the top can look unnatural. Only remove obvious stragglers from the top.

    Aftercare

    Once you’ve shaped your brows, cleanse the area again using a gentle cleanser such as micellar water, applied using a cotton pad. Then apply a soothing gel, containing aloe vera or tea tree oil to reduce redness.

    To prevent blocked pores and infection, try not to touch the tweezed area once you’ve finished.

    Brow products

    If you go into any drugstore or online beauty website, it can seem like there’s an overwhelming array of eyebrow care products available.

    If your brows are full and well pigmented, you can probably skip products designed to fill or color your brows. Instead, a quick sweep of brow gel may be all that’s needed to keep your brows tamed.

    However, if your brows need additional color, whether it’s because they lack pigmentation or because they are patchy, be careful not to go too dark. Unless your hairs are very pale-colored, aim for a shade that matches, or is a shade lighter than your natural brows. If your brows are very light, you could go a shade darker, but no more.

    Eyebrow pencils can be very precise but do require a light touch – feathery strokes are the aim here. You might prefer to use a brow powder instead as it’s easier to create a much softer, more natural look.

    If you follow our advice, you should be able to maintain your brows in decent shape until you are able to get back into a regular routine of salon visits!

    Written exclusively for our company by Sally Wood

    Source: CoolMambo.com

  • Skincare Routines that could eliminate Freckles in Seven Days

    Skincare Routines that could eliminate Freckles in Seven Days

    Are there brownish spots on your face that you would love to get rid of in a few days? Well, freckles can prove challenging to clear without the right treatments and procedures. However, in this post, I would be sharing a few routines that could get them off in time.

    Image by wayhomestudio via Freepik

    What Causes Freckles to Appear on the Face?

    Freckles are those light brownish skin pigmentations that appear as spots on your face, arms, and shoulders. They are majorly caused when your bare skin is exposed to sunlight for way too long. Like you would experience with acnes, the patchy skin and exposed pores do not just go off with ease.

    Getting rid of them would take precision and strict adherence to the right skincare routine. Typically, they are not harmful to your health as they are simply secretions of melanin. But, if you want to return to that spotless skin you once had, then you need this.

    Note that freckles could be caused by hormonal imbalance apart from sunlight, and you cannot control where they appear.

    Routines that Could Eliminate the Freckles in Seven days

    Now you know all about freckles, let’s see how they can be cleared out. In this section, I would give you five home-friendly routines that you could adopt.

    #1: Lemon Juice

    Overtime, lemon juice has proven to be a formidable combatant of several skin blemishes and pigmentations. When it comes to freckles, it also brings such similar effectiveness. It is a natural lightening agent that could fade out the pigmentations triggered by the freckles.

    Lemon juice is something that you can quickly get in your home and apply every day. However, when used on freckles, you should follow the following steps:

    • Wash out your skin thoroughly: For any skincare routine to work, you would need a clean skin. This allows the product to go in, without dirt getting in the way.
    • Squeeze out in a bowl: Here, I would recommend cutting your lemon open and squeezing the juice into a clean bowl.
    • Apply on your skin: Now, you can take out two to three teaspoons and apply them to your skin. Do this by gently massaging until the whole place is covered in the juice.
    • Allow to set: The final stage is letting it work its magic. Leave the juice for the next 8 to 10 minutes.

    This procedure is suitable if you intend to extract each day. However, if there is any leftover lemon juice, you could refrigerate and use it at night. But, dispose of anyone that stays past one day.

    Also, there are already extracted lemon juice available in the market. With that, you could skip to the last two steps and store as is recommended on the bottle. Repeat this procedure at least twice a day for optimum results.

    #2: Aloe Vera

    Skincare experts know the aloe vera as a solution to most types of skin pigmentation. It is rich in an organic component known as “Aloesin.” When this component touches the freckles, it gradually fades them out till they no longer exist.

    You can apply this skincare solution by getting a freshly cut aloe vera or purchasing the market’s organic gel. For the best results in a week, you should use this daily to the freckles.

    To apply the aloe vera, you should follow the steps below:

    • Wash your skin thoroughly: This is an unavoidable step on your journey to a freckle free skin. Take out any dirt that may be lurking around the region as it would help the aloesin penetrate.
    • Wash the Aloe Vera: This is only applicable when the aloe vera is freshly cut from your pot or garden.
    • Apply on the surface: If it is your face, then apply the gel all over your face and set for 15 minutes.
    • Rinse out: You can do this with either room temperature or lukewarm water. But, not too cold.

    Still not satisfied with this procedure? Well, check out the next.

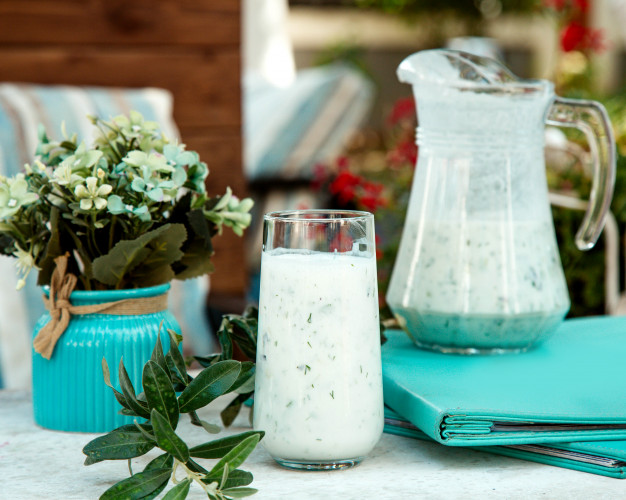
    #3: Buttermilk

    The next solution is buttermilk, and this one promises you more than the others. The buttermilk takes out the brownish signs of freckles and still leaves your skin looking more hydrated and supple than ever.

    However, this is an exceptionally effective method, and you would only need to apply this three times. In these few days, you would notice a massive change in your skin. Many freckles would be out already, and your skin would almost be at its best again.

    To use the buttermilk, follow the routine below:

    • Wash out the region as you have done in other solutions.
    • Produce a thick paste out of the milk with oatmeal.
    • Apply on the pigmented region and leave out for the next 15 minutes.
    • Take out the paste using a lukewarm warm.

    #4: Almond Oil

    Almond oil serves as a form of great nourishment for the skin and helps in controlling pigmentations. It contains a healthy dose of vitamin E and Vitamin A, known to nourish the human skin. You can apply this on the freckled spin and leave for up to an hour.

    In some instances, if you are up to it, then you could leave on the skin all through the night. An overnight treatment is highly recommended as your pores are calmer while you sleep.

    However, to apply the almond oil, follow the steps below:

    • Cleanse the region: This is to get the pores clean and more receptive to the oil.
    • Heat the oil: Take a few drops of the almond oil and safely heat it.
    • Apply on the surface: Using your fingers, gently massage the oil into your skin.

    Once you are ready to clean out the almond oil from your skin, rinse using lukewarm water.

    #5: Bananas and Mint

    Bananas are naturally known for their hydrating powers, while mint has antioxidants. The mix of these two would clear out the freckles and leave your skin looking refreshed. Applying them would be just as you were to use a face mask.

    To get this duo ready, follow the instructions below:

    • Clean them all: This stage, you should wash out the banana and the mint. Then you should wash out the region as well.
    • Make the mask: You can do this by mixing the mint and mashed banana. This may require a mixer, but ensure you get the right mix.
    • Use the mix: Now, apply the mixture to your face and leave to set for the next 8 to 12 minutes.

    You could use this mix at least three times a week for faster results.

    Conclusion

    Freckles do not have to stay if you don’t want them. There are ways you could get them out, and I have listed them in this post for you. Ensure you stuck to one that is best convenient and watch out for solutions that could trigger an allergic reaction.

    Written exclusively for our company by Sherise

    Source: CoolMambo.com

  • How to care for naturally curly hair

    How to care for naturally curly hair

    For years, I battled with my naturally curly hair. Every hairdresser I visited either wanted to straighten it into submission or turn me into a poodle-permed glam-rocker from the eighties.

    When I tried to style my hair at home, I would either end up with a mountain of soft, unmanageable frizz or curls that were so crispy and crunchy you could hear me rustle as I approached.

    Then one evening at a business function, I was talking to a woman with beautifully defined natural-looking curls. I couldn’t stop looking at them! Over a drink afterward, I asked her which products she used, and – you’ve guessed it – she told me that she was a fan of the Curly Girl Method popularised by hairdresser Lorraine Massey. I ordered the book from Amazon as soon as I got home.

    Since then, I’ve built a bespoke routine to look after my curls – blending inspiration from the Curly Girl Method with my real-life experience. But it’s taken a lot of trial, error, and frustration along the way. Here I’ll share what eventually worked for me.

    Image by javi_indy via Freepik

    To shampoo, or not to shampoo?

    For me, probably the most surprising aspect of the Curly Girl Method was that it advocates completely moving away from the use of shampoo.

    At that point, I was washing my hair – with shampoo. EVERY SINGLE DAY.

    This was pretty much out of frustration with the frizz I encountered each morning when I woke up. I was getting in the shower anyway, so wasn’t it easier just to start again each day and tame my unruly locks by washing and styling my hair, battering into submission with a combination of heat styling and products?

    It felt like a huge leap, but I was prepared to give it a go. I removed all shampoo from my hair care routine immediately and moved to ‘co-washing’ instead – using a conditioner to cleanse the scalp and hair.

    And I hated it.

    My scalp felt greasy, my hair felt lank and lifeless. I felt like people might be looking at me like that guy we’ve all encountered, who tells you he’s gone back to nature and given up on deodorant and shower gel and has never felt cleaner – the one you can smell from a mile away.

    So I went back to shampoo, but I decided to try washing my hair every other day. After a couple of weeks, my hair felt more balanced. So I decided to experiment with co-washing for one wash a week – and it was ok! Over a year or so I transitioned from one co-wash a week to one shampoo wash a week, still washing every other day.

    I started to get compliments on my hair. It was less dry and frizzy, and my curls were looking more defined. It felt good! Over the following year, I cut down the frequency, so I was washing my hair around once every three days, with one shampoo wash, followed by 2 conditioner washes. My hair has improved massively – and that’s the washing routine I’ve stuck with ever since.

    My top tips:

    • If you’re planning to change your hair-care routine, transition into it gradually
    • Try to use sulfate-free shampoo if you can, and chose one for dry or damaged hair, as this will avoid stripping your hair of its natural oils
    • For best results, loosen and separate your curls before washing by running your fingers through your hair
    • As hair-washing is more about keeping your scalp clean, focus on massaging the cleansing product you are using into the scalp with the pads of your fingers to dislodge any build-up
    Image by drobotdean via Freepik

    Conditioning your curls

    Curly hair can be prone to dryness – and that’s one of the culprits when it comes to frizz. Your waves and curls need plenty of moisture to keep them looking their best, and to avoid damage or breakage. And the curlier your hair, the dryer it tends to be – due to the shape of the hair strands, your hair’s natural oils may struggle to travel down the hair shaft and coat the entire length of your hair – so it helps to focus on the ends of your hair.

    It’s also a good idea to use a deep-conditioning treatment every week or two – I tend to do this when I’m using shampoo to wash.

    Drying your hair

    It’s really easy to undo all that care by taking an aggressive approach to drying your hair. Frantically rubbing your hair with a terry towel will disrupt the cuticle and turn your hair into a frizz ball if you’re not careful. I saw a huge improvement when I started using a microfiber towel to dry my hair, particularly when I invested in a couple of microfiber towel turbans. I wrap the towel around my hair and allow it to soak up the moisture instead of rubbing. As an alternative, some people swear by using an old t-shirt to blot the hair.

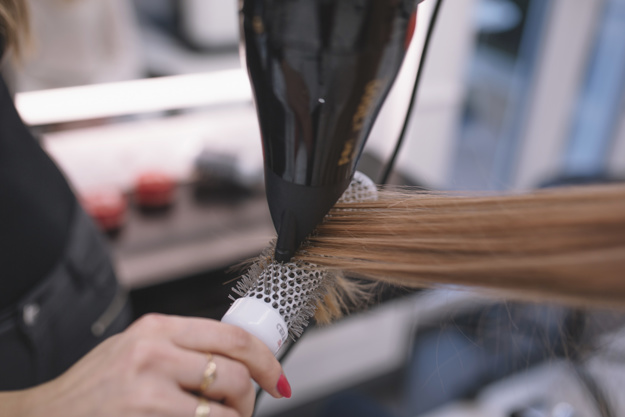
    And what about hair dryers? Ideally, it’s best to let your hair dry naturally, but we all know that sometimes there just isn’t time – if you do need to use a hair dryer, use it on a low setting with a diffuser, and make sure you use a heat protectant product to minimize damage.

    Styling products

    Before I apply any products to my wet hair, I gently separate my curls using my fingers, as brushing can damage and break the hair. I then spray my hair with a leave-in spray conditioner designed for damaged hair – I find it helps with the battle against frizz!

    I then apply a styling product to help encourage my curls to form. My personal choice is to use a styling mousse specifically designed for curly or frizzy hair, although this does go against the Curly Girl Method which recommends using gel products – I just don’t like gels. You could also use a curl cream, but as with everything, it’s best to experiment and find the routine that suits you and your hair.

    Definition

    Once my hair is dry, I gently scrunch a little bit of serum into the ends for extra definition. You could also use an oil, such as jojoba or avocado if your hair is particularly thirsty or if your curls are on the tighter or collier end of the spectrum, but apply sparingly – it’s easier to add more but once it’s applied, you can’t take it away!

    Other tips

    Try to protect your hair from humidity, particularly in the shower. On days when you’re not washing your hair, use a shower cap to protect from the dreaded frizz.

    Don’t brush or comb your hair. It can lead to damage or breakage – instead use your fingers to gently move your curls into place.

    At night, consider using a silk or satin pillowcase to protect your curls while you sleep, as cotton pillowcases can be abrasive to your curls.

    And finally – choose your hairdresser carefully! You may have to kiss a few frogs first, but having a hairdresser who understands curly hair, and who cuts your hair into a style that works with and encourages your natural curls can make a huge difference. Some prefer to cut hair dry, others wet, but your hairdresser should look at your hair when it is dry and make sure they understand the way your curls form – we all know how much curly hair bounces up when dry, and you should be confident that your hairdresser knows how to take this into account.

    Why not try some of my tips to care for your curls? After some trial and error, you’ll find the hair care routine that works best for you – and your hair will repay you by looking and feeling great!

    Written exclusively for our company by Sally Wood

    Reference

    Massey, Lorraine; Bender, Michele; Chiel, Deborah (2011). Curly Girl: The Handbook. Workman Publishing. ISBN 9780761156789.

    Source: CoolMambo.com

  • Tips On Having the Best Alte Look Without Overdoing It

    Tips On Having the Best Alte Look Without Overdoing It

    As an alteist, it is normal to match the “wrong” outfits sometimes. This could happen at any time and cause your outfit to seem a bit overboard. In this post, I have highlighted a few tips that would help you achieve your look without falling short of perfection.

    What is An Alte Look?

    An alte look is a well thought out mix of your creativity and a retro or vintage touch to produce an edgy style. An alte look aims to create a unique and fun style that is particular to your personality.

    Most alteist adopt the style intending to explore the reins of creativity when it comes to fashion. However, being an alteist isn’t peculiar to just fashion, as it is also regarded as a lifestyle.

    Image by lookstudio via Freepik

    Tips on Having The Perfect Alte Look

    As an alte dresser, there are ways and a few guidelines that should help you get just what you want. They allow you to stay in touch with your intentions without going overboard.

    So, here are a few tips that could help you as an alteist or an intending alte dresser.

    #1: Pick out the right colors

    In alte fashion, colors can be the catalyst that brings the whole idea to life. With the right blend of colors, you can come out looking as you imagined. Since alte is all about reproducing a retro look in a rather significant manner, it should be just that. Don’t do boring colors. Every one aside the alte dresser does that.

    The end goal is to produce a fashionable look that throws people off the edge. In this case, you have the freedom to blend the most distinctive colors in an outfit. However, ensure these colors do a great job of complementing your skin tone as it is the first step to having a perfect look.

    #2: Keep a neutralizer handy

    When I say a neutralizer, I mean something that could save the day when it seems your style is going off the rails. This situation happens when you have planned out your outfit, and when you finally have it on, it doesn’t look like you want.

    A neutralizer is a combination of fashion accessories or clothing that has proven to look good.  It could be either of the following:

    • Footwear.
    • A neckpiece.
    • An eyeglass.
    • A dress.
    • A jumpsuit, etc.

    These fashion items are there to swoop instead of forcing a subjectively failed outfit. Forcing an outfit in alte fashion barely gives you the right finishing. If it’s an outfit or an accessory that has failed, go for your neutralizer.

    Image by svetlanasokolova via Freepik

    #3: Try it out first

    Instead of needing a neutralizer, you can avoid all of that within a few minutes. A lot of alteist do not come out as they imagined because they made it all in their head. It is undeniable that creativity starts up in the head before it is brought to life, but sometimes that seal of perfection is needed. This could mostly be achieved by trying out the blend being your outing.

    Your mirrors do a great job of showing you the results, and consulting them a night before is never a wrong decision. You get ample time to touch up anything that you may have missed out in the planning stage.

    Still, as an alte dresser that intends experimenting with your creativity, it is acceptable to be spontaneous. Spontaneity is highly celebrated in the alte world. However, before you become a pro at this, I would advise you always tried it out before the expected date.

    #4: Stay updated

    The process of researching is the core of a successful outfit. Alte, in its proper form, can be regarded as a themed fashion. Themed fashion statements are outfits adopted to represent a particular culture or timeline.

    Alte has metamorphosed into a culture, and knowing all about that culture helps you stay true to the art. Your alte styled outfits could get messy and confusing when you do not know anything about the culture.

    So, I would recommend that you did your research as it not only keeps you real to the alte culture. It does a great job of helping you figure out more blends that would keep you on track

    #5: Stay comfortable

    Even with fashion evolution and how popular alte fashion has become, there are still untouched areas. Not everyone you meet would be satisfied with your style, and trying to look acceptable ruins the whole idea.

    As an alteist, staying comfortable in your creativity gives you enough flexibility to bring your styles to life. Remember, holding back has nothing in the world of alte as the lifestyle is set to get past the stereotypes.

    In all you do, stay comfortable as it is the key to your creativity!

    Conclusion

    Going overboard as an alte fashion enthusiast could be easily avoidable. Though there are a few enthusiasts that may not agree to the term “overboard.” But, if you want to stay within your style’s constraints, these tips would surely come in handy.

    Written exclusively for our company by Sherise

    Source: CoolMambo.com

  • The Latest Trends in Korean Skin Care

    The Latest Trends in Korean Skin Care

    1. 10 Step Skincare Routine

    The 10-step routine is the global phenomenon that brought Korean beauty to the worldwide stage. Love or loathe the concept, it’s the only place to start when discussing Korean beauty trends!

    There are several different variations of the Korean 10-step (or 8-step, or 7-step…) skincare routine, but they generally look something like this.

    1. Oil cleanser – the first part of the ‘double cleanse’ process, which removes makeup, SPF, and oil-based impurities.
    2. Water based or cream cleanser – the second part of the double cleanse, which removes sweat and dirt that the oil cleanser did not shift.
    3. Exfoliator – keeps skin clear of dead cells, for a smoother, brighter appearance.
    4. Toner – a hydrating product to prep the skin to absorb the products in the next stages.
    5. Essence – a lightweight product which acts as the second layer of hydration.
    6. Treatment products – such as ampoules, serums and boosters, which are highly concentrated, and target specific concerns such as fine lines, hyperpigmentation or acne.
    7. Sheet mask – even if you’re not a Korean beauty aficionado, you’ve probably tried one of these! Soaked with concentrated essences or serums, they stay moist throughout and allow you to relax while your face soaks up the hydrating nutrients.
    8. Eye cream – the thin, delicate skin around the eyes is prone to wrinkles, dark circles and fine lines – the sooner you start using it, the longer you’ll keep them at bay.
    9. Moisturizer – seals moisture and hydration from the previous steps. Most skin types will only need a very light layer after applying the other products.
    10. Sun protection (morning) – this should always be the last daytime step and should be reapplied during the day.

    Sleeping mask (night) – this is the last night-time step and is basically a night cream that’s designed to help your skin repair itself while you sleep.

    1. Skip-care

    It’s pretty clear that the 10-step routine described above is aspirational, but not realistically achievable for most of us – my bathroom shelf certainly isn’t that big! Plus, it’s incredibly time consuming.

    Which leads us to a growing trend in Korean skincare – ‘skip-care’ – which is a way of simplifying your skincare routine. Rather than sticking to the letter of the 10-step routine, Korean millennials have realized that following every stage isn’t necessary to have healthy-looking skin.

    As an example, using exfoliating products on a daily basis, no matter how gentle they are, can damage the skin’s barrier and cause irritation and redness. And layering multiple products can increase your tendency to break out.

    Instead, the ‘skip-care’ trend encourages you to focus on building a consistent routine that focuses on what your skin actually needs, while ensuring that you use quality products suited to your skin type.

    Taking things back to basics, this could mean a morning routine of:

    1. Water-based or cream cleanser
    2. Hydrating toner
    3. Moisturizer
    4. Sun protection

    With an evening routine of:

    1. Oil cleanser
    2. Water-based or cream cleanser
    3. Hydrating toner
    4. Moisturizer

    You can then introduce additional products where required to address your skin’s specific needs. It’s also worth checking to make sure the products you use are labelled ‘non-comedogenic’, particularly if you are prone to acne or congested skin.

    1. Glass Skin

    The ‘glass skin’ trend aims for skin that is so smooth, flawless and glossy that it reflects light like a piece of glass, with an emphasis on a poreless appearance. It is typically achieved by using a multi-step approach, with an emphasis on hydrating products. Again, great in principle, not always easy to follow in practice.

    In the spirit of ‘skip-care’, there are now specialist products that can be used to enhance a simpler skincare routine by creating a shortcut to that sought-after glassy appearance.

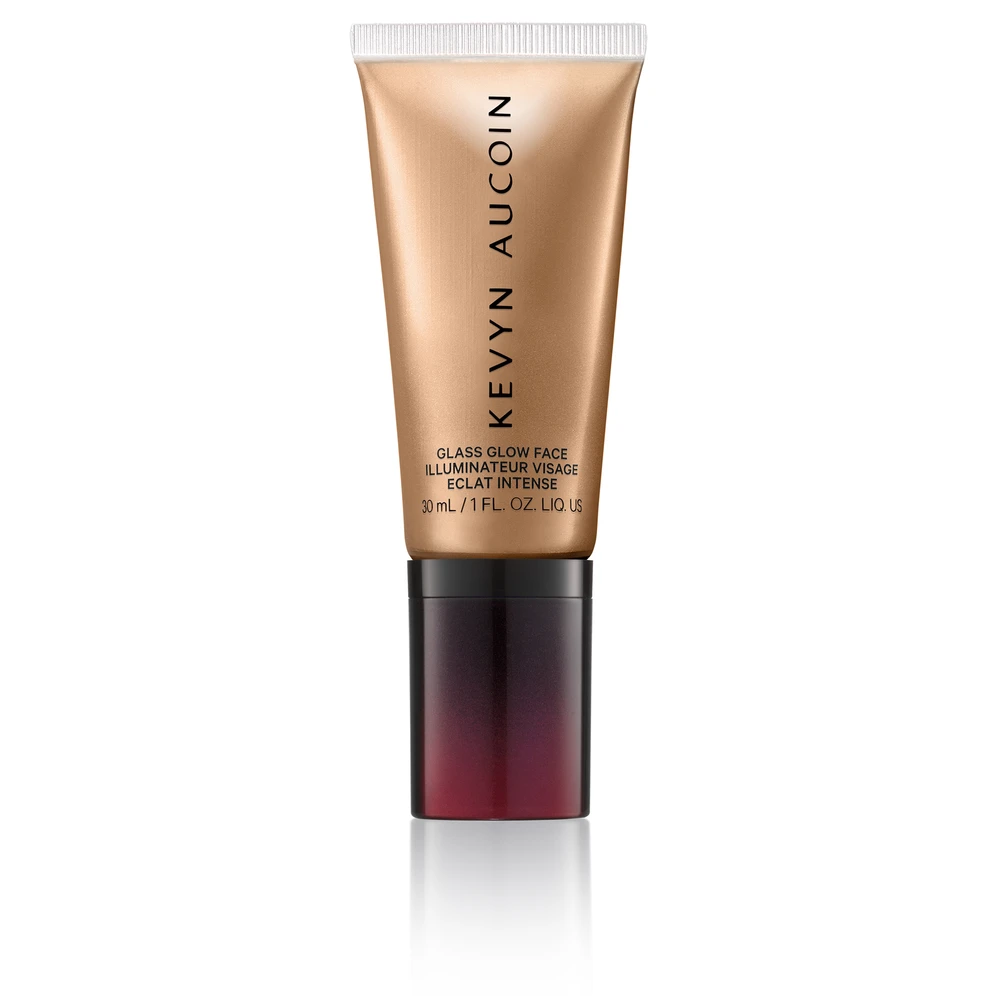
    This Glass Glow Face and Body Gloss is available for $32.00 from www.kevynaucoinbeauty.com

    It’s a gloss highlighter for face and body, available in six shades, that claims to create ‘youthful-looking, well-hydrated skin, with a glassy complexion’. It can be used straight after your skin care routine, or on top of makeup.

    Source: https://kevynaucoinbeauty.com/products/glass-glow-face?variant=19733779087447

    1. Cream skin

    We’ve looked at the Korean glass skin trend – now let’s look at the ‘cream skin’ trend.

    Cream skin is actually both a look and a product. It’s a softer, less shiny (and more attainable) look than the seemingly impossible dream of glass skin, with its multiple layers of product! The aim is a moisturized, soft and supple look.

    Cream skin also refers to a hybrid skincare product – a lightweight lotion that acts as a toner and moisturizer combination. In fact, this is a great example of a more minimalist ‘skip-care’ approach. These products are ideal for those with oily skins, or in hot humid climates.

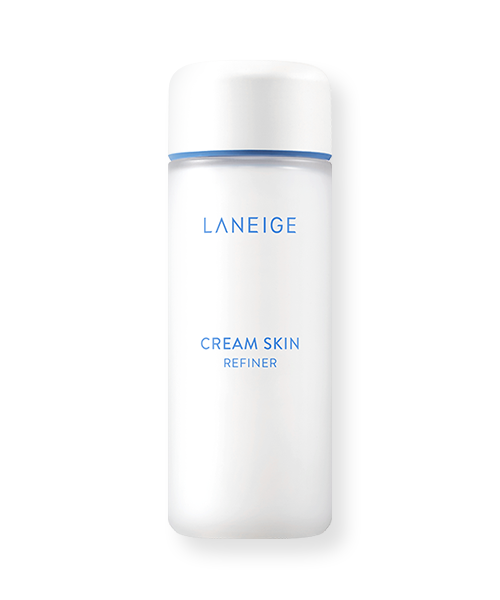
    La Neige were one of the first brands to develop a cream skin product, and their Cream Skin refiner is available for $34.99 from www.amazon.com.

    It is described as ‘a moisturizing toner with a whole bottle of cream dissolved to keep the skin hydrated’. The product also contains white tea leaf water to fortify the skin’s barrier (more about that later!).

    Source: https://www.laneige.com/int/en/skincare/cream-skin-refiner.htm

    1. Cloudless skin

    Cloudless skin is more of a philosophy than a specific skincare treatment or product. Instead, it’s about aiming for a clear, unblemished and healthy-looking skin, through generally living a healthy lifestyle – getting plenty of sleep, taking care of your skin, and eating well.

    For Korean women, cloudless skin is seen as something to aspire to – the perfect smoothness and clarity of a young child’s skin. Being told you have ‘cloudless skin’ by a Korean person is the ultimate compliment!

    Key areas of focus include:

    • Thorough cleansing and gentle exfoliation
    • Hydration and moisturizing
    • Protecting from hyperpigmentation and fine lines by using an SPF
    • A healthy diet containing lots of fruit, vegetables, and whole grains, avoiding over-processed foodstuffs
    • Sleep – and lots of it – to help your skin to repair overnight
    • Avoiding stress – although we all know that is easier said than done! Try yoga or meditation to help you relax.
    • A regular exercise routine will improve your blood circulation and help deliver oxygen to the skin.
    • Finding what works for you – and sticking to it. Cloudless skin doesn’t appear overnight but takes effort and consistency.

    Ultimately, you should be aiming to have naturally healthy skin, rather than having to use products to cover up the signs of unhealthy skin.

    1. Skin immunity

    We’re all concerned with our immune systems right now, but Korean beauty has a big focus on ‘skin immunity’ – repairing and maintaining your skin’s barrier. This helps keep the bad stuff – bad bacteria, pollution – out, and the good stuff – moisture and hydration – in.

    Products that can help strengthen the skin’s barrier contain ingredients such as fatty acids and ceramides, which calm, hydrate and repair. Antioxidants such as vitamin C can help protect your skin from environmental pollution.

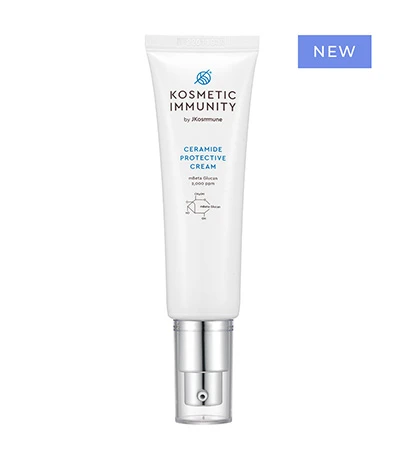
    This Ceramide Protective Cream from Kosmetic Immunity contains mBeta Glucan, which is claimed to be 20% more hydrating than Hyaluronic Acid, while boosting the skin’s immunity and strengthening its barrier. It’s available for $53.00 from www.kosmeticimmunity.com

    Source: https://www.kosmeticimmunity.com/products/ceramide-protective-cream
    Written exclusively for our company by Sally Wood

    Source: CoolMambo.com